DAI (Dynamic ARP Inspection)
1. Introduction to DAI
If you’re here, you’re probably curious about Dynamic ARP Inspection (DAI)—and I must say, it’s an interesting and important topic!
Before diving into DAI, let’s first refresh our understanding of ARP (Address Resolution Protocol) to ensure you grasp the core concepts.
What is ARP?
ARP is responsible for mapping IP addresses to MAC addresses within a local network.
When a device only knows the IP address of another device, it uses ARP to discover its corresponding MAC address.
How ARP Works
To better understand ARP, let’s look at a simple network with the subnet 192.168.1.0/24.
Here we have a network 192.168.1.0/24:
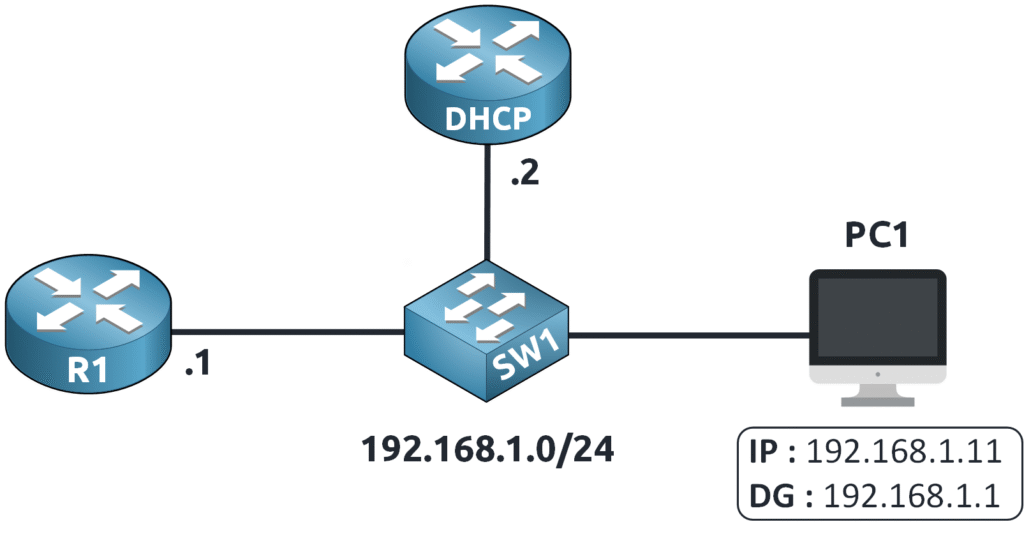
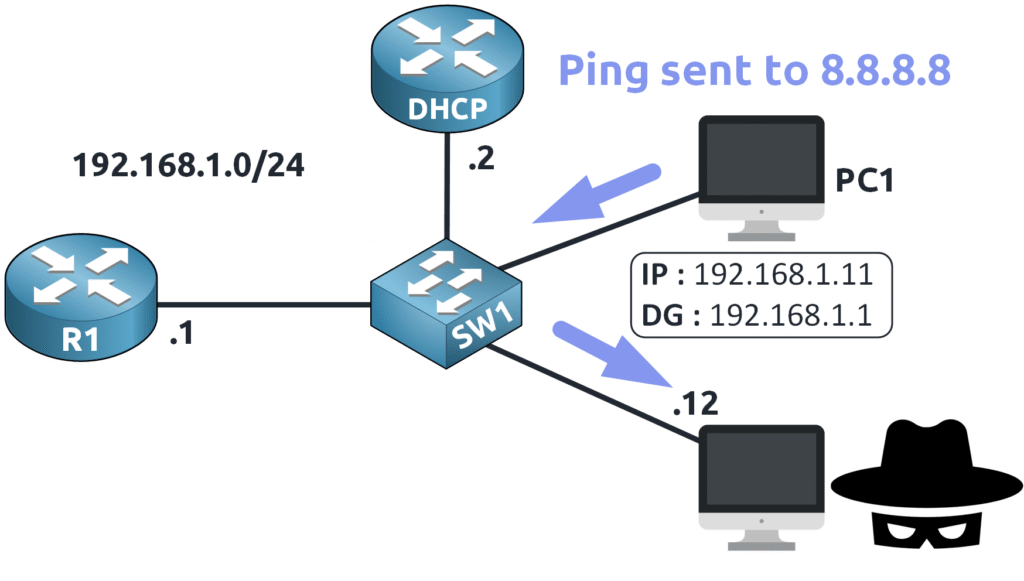
PC1 is configured using a DHCP server and has an IP address of 192.168.1.11 with a default gateway of 192.168.1.1.
Imagine PC1 wants to send a ping to 8.8.8.8!
Since the destination is outside the 192.168.1.0/24 subnet, PC1 must send the traffic through its default gateway (R1).
ARP Process in Action
When the ping to 8.8.8.8 is initiated, PC1 first checks its MAC address table.
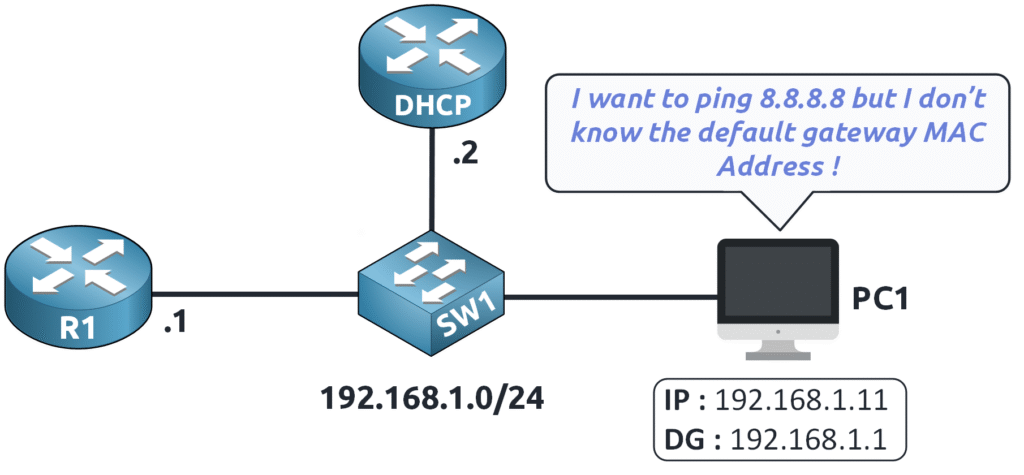
Since the MAC address of 192.168.1.1 is unknown…
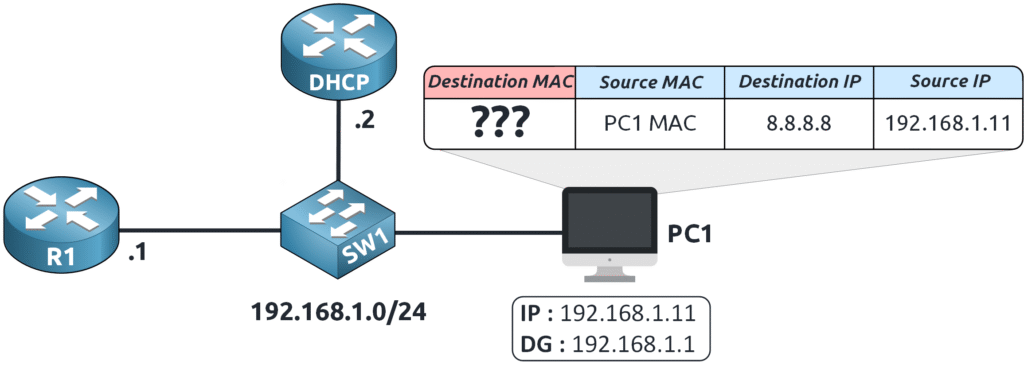
PC1 sends an ARP Request to the local network:
“Who has 192.168.1.1? Tell me your MAC address!”
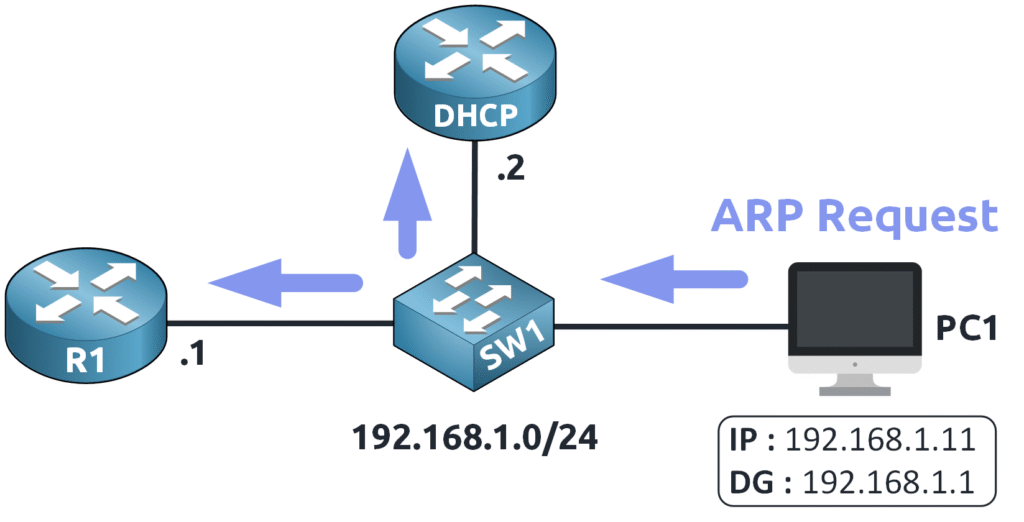
The router (R1) receives the request and responds with an ARP Reply providing its MAC address.
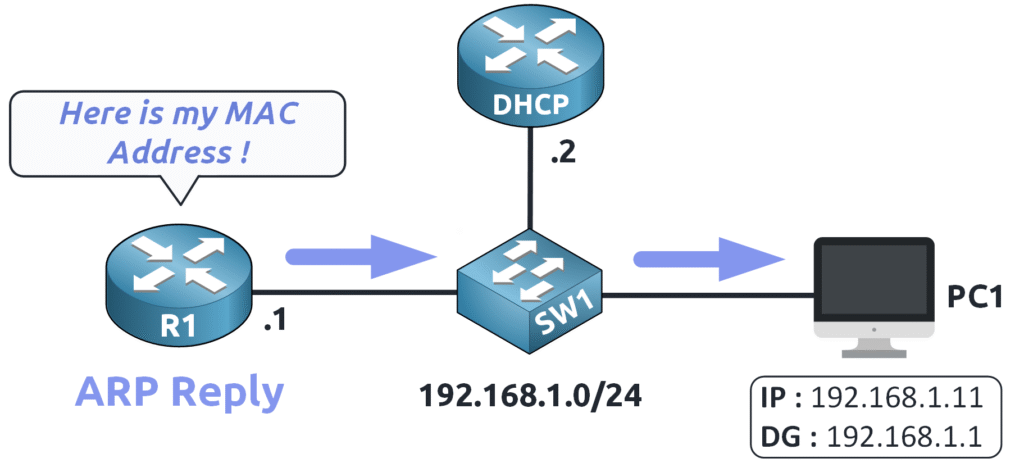
Now that PC1 knows the MAC address of 192.168.1.1…
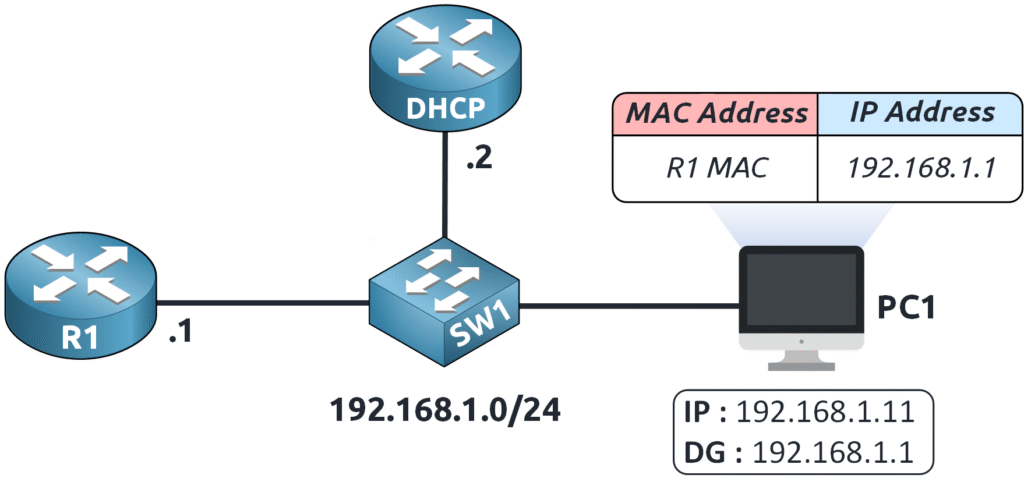
It can send the ping to 8.8.8.8 through the default gateway !

That’s a basic review of the ARP process! Now, it’s time to grab a cup of coffee ☕ before we dive into ARP Attacks and why they pose a serious risk to your network.
2. Understanding ARP Attacks
ARP is essential for network communication, but attackers can exploit its weaknesses to manipulate traffic.
One common attack using ARP is the Man-in-the-Middle (MitM) attack, which we will break down step by step.
Understanding Gratuitous ARP (GARP)
Before explaining the attack, it’s important to understand Gratuitous ARP (GARP), a mechanism that attackers can exploit.
A Gratuitous ARP is a special ARP message sent without being requested, unlike a normal ARP reply.
For example, instead of responding to an ARP request (like when PC1 asks Router R1 for its MAC address), a device using GARP simply announces:
“I am 192.168.1.1, and my MAC address is XX:XX:XX:XX:XX.”
This is useful when a device changes its MAC or IP address and needs to notify the network. However, attackers can misuse this method to trick devices into updating their ARP tables with false information.
How ARP Poisoning Works
- The Attacker Sends a Fake GARP Message
An attacker broadcasts a Gratuitous ARP message falsely claiming to be the router (192.168.1.1), telling all devices:
“Update your ARP table! The MAC address for 192.168.1.1 is now mine.”
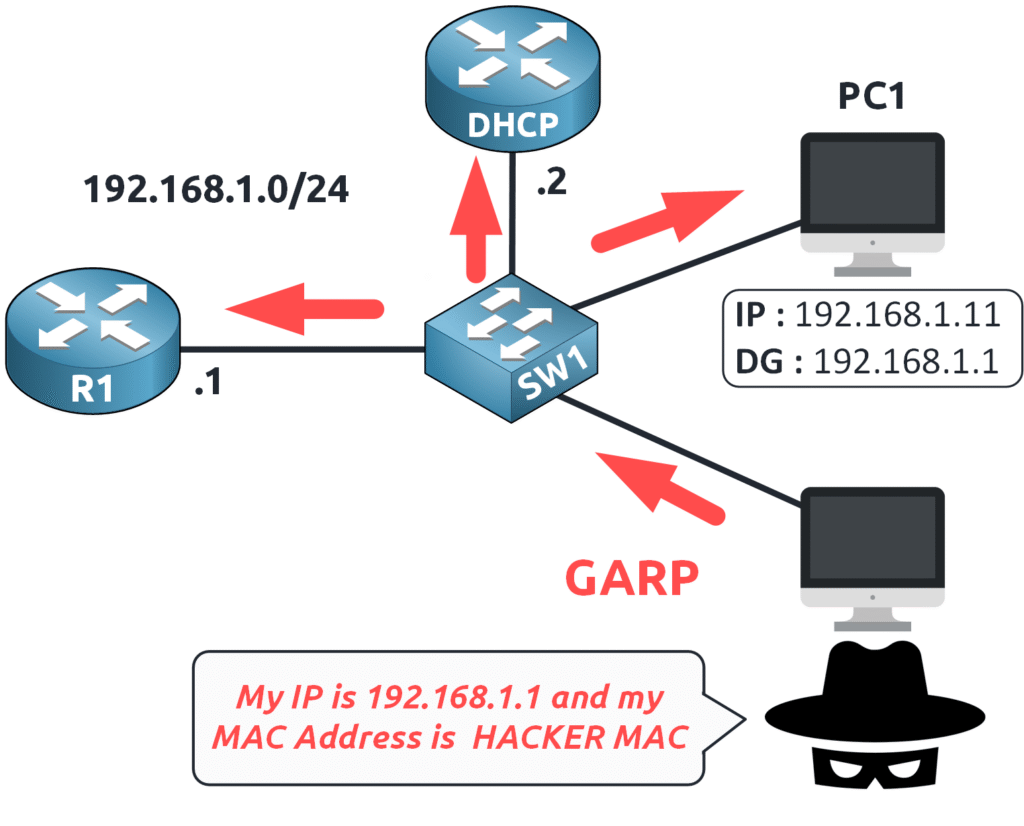
- Devices Update Their ARP Tables
PC1 receives this false information and updates its ARP table, associating 192.168.1.1 with the attacker’s MAC address, believing it is the legitimate router.
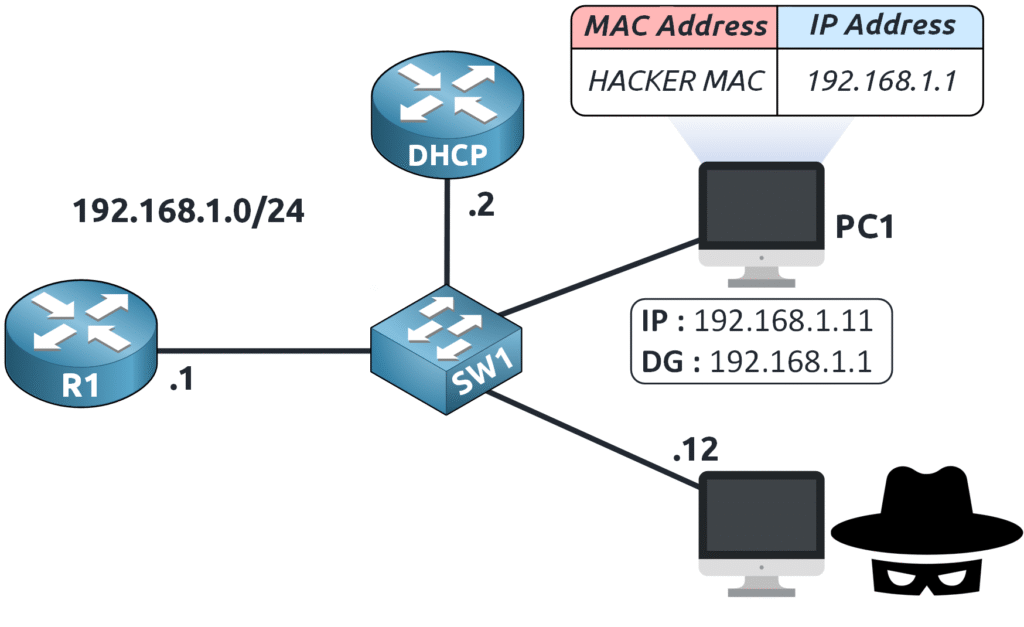
- PC1 Sends Traffic to the Attacker Instead of the Router
Now, whenever PC1 needs to communicate with 192.168.1.1 (its default gateway), it sends its traffic to the attacker first.
- The Attacker Intercepts and Forwards the Traffic
To avoid detection, the attacker forwards the intercepted traffic to the real router (R1). PC1 continues functioning normally, while the attacker secretly monitors all communication.
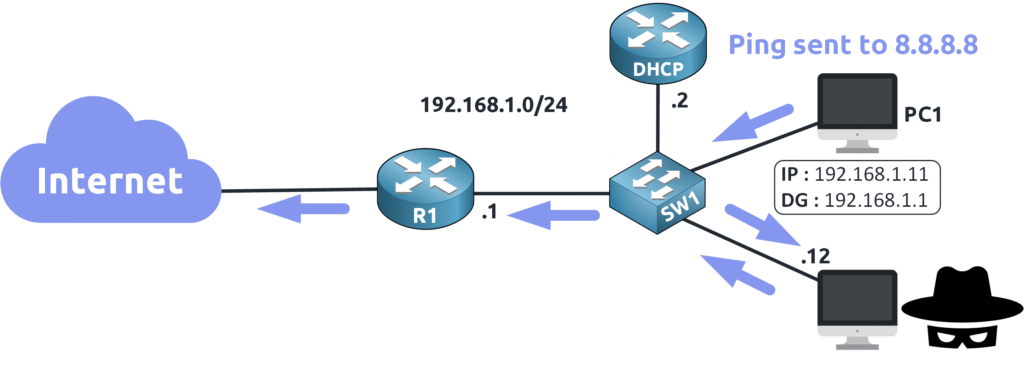
To protect against ARP attacks, we can implement Dynamic ARP Inspection (DAI) to secure the network !
3. DAI Operation
What is DAI?
Dynamic ARP Inspection (DAI) is a switch security feature that prevents ARP attacks by validating ARP messages on the network.
Okay, but how does it actually work?
Trusted vs Untrusted Ports
DAI operates by classifying switch ports into two categories:
- Trusted ports
- Untrusted ports
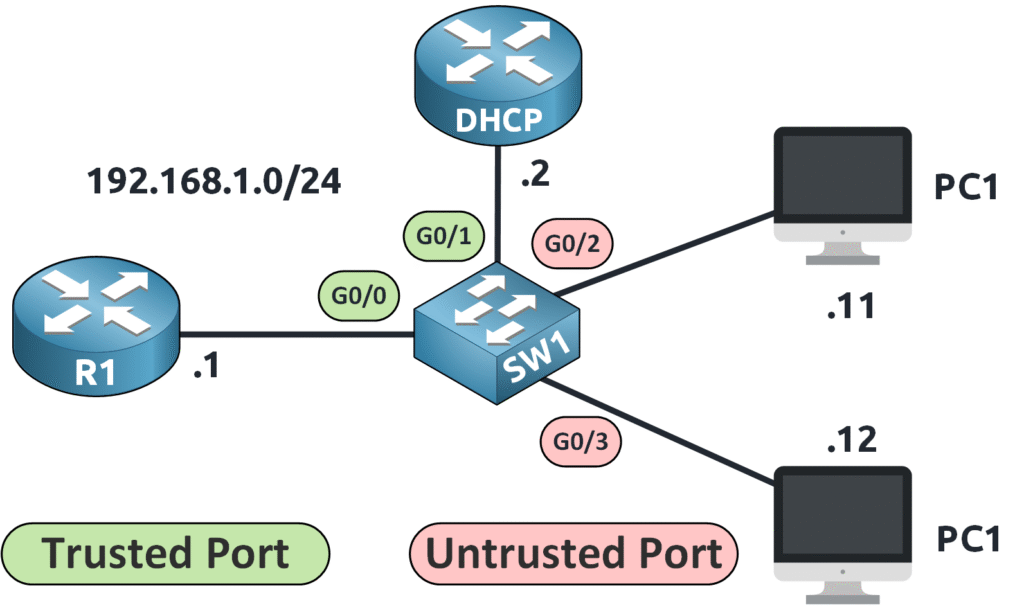
By default, all ports are considered untrusted!
Trusted Ports
Trusted ports are used for connections between network devices such as switches and routers—devices we control and trust.
On trusted ports, ARP packets are not inspected because network infrastructure devices are considered secure.
💡 Example: On switch SW1, the interface g0/0 (toward R1) and interface g0/1 (toward the DHCP server) are trusted.
Untrusted Ports
Untrusted ports are ports where end devices (such as PCs) connect. Since ARP attacks originate from compromised or malicious devices, DAI inspects all ARP messages received on these ports.
💡 Example: On switch SW1, interfaces g0/2 and g0/3 are untrusted because we cannot control what end users do with their devices. If an attacker spoofs ARP packets, it could compromise the network.
How DAI Works
Let’s break down how DAI actually functions in practice:
Step 1: ARP Packet Classification
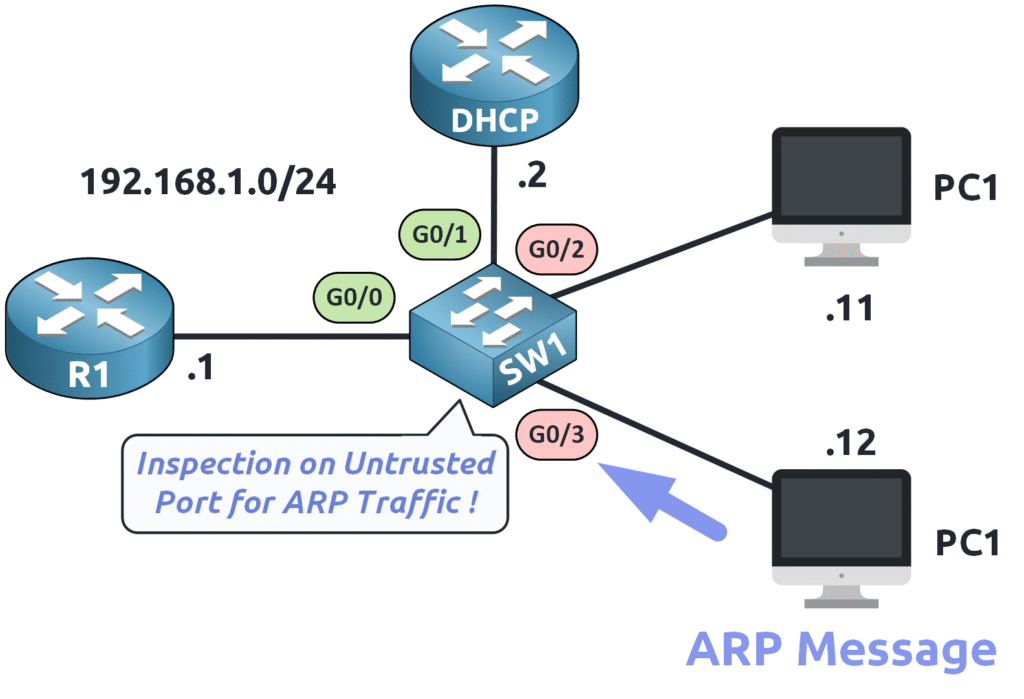
Whenever an ARP message arrives at a switch port, the switch determines whether the port is trusted or untrusted:
- If the port is trusted → The ARP packet is immediately forwarded.
- If the port is untrusted → The switch intercepts and inspects the ARP packet before deciding to forward or drop it.
Step 2: Checking Against the Binding Table
DAI does not inspect ARP packets blindly—it requires a reference to determine whether an ARP message is legitimate or fraudulent.
This reference is called the DHCP Snooping Binding Table.
Wait, what’s a binding table?
The DHCP Snooping Binding Table is created by DHCP Snooping, a security feature that records legitimate IP-to-MAC mappings for devices using DHCP.
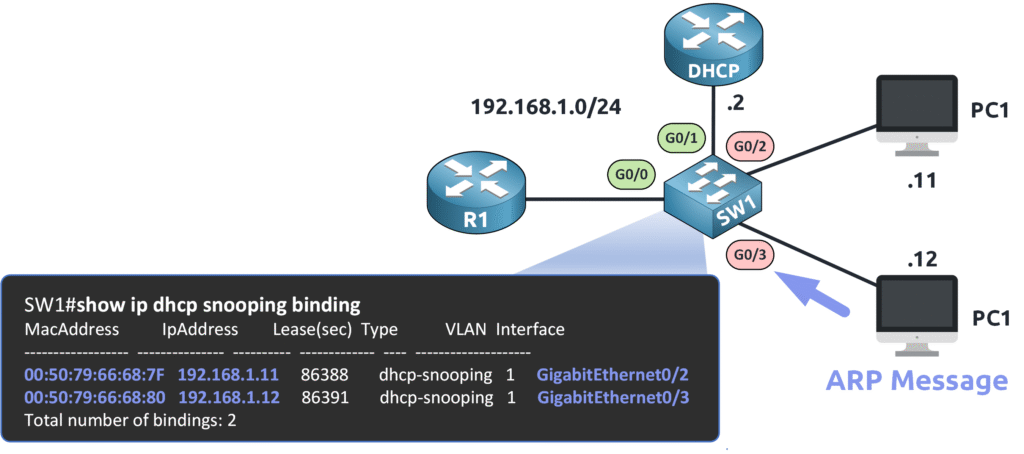
Each entry in the table contains:
✅ IP address → The assigned IP of a legitimate device
✅ MAC address → The corresponding MAC address
✅ Port number → The switch port where the device is connected
Step 3: ARP Validation
Now that the switch has a binding table, it can compare incoming ARP messages on untrusted ports against the stored data:
- If the sender IP and MAC address in the ARP message match an entry in the table, the packet is considered valid and is forwarded.
- If the MAC address in the ARP message does not match the registered entry, DAI drops the packet to prevent spoofing.
Step 4: Blocking Malicious ARP Messages
If an attacker tries to send a fake ARP message to impersonate another device, the binding table won’t recognize the altered MAC address.
🚫 Result: The switch immediately blocks the ARP packet, preventing unauthorized access to the network.
Okay, enough theory—we’re not in a classroom! Let’s dive into practical configuration!
4. DAI Configuration
To configure Dynamic ARP Inspection (DAI) on SW1, we need to follow a precise set of steps.

Our network topology includes a DHCP server assigning the following IP addresses:
- PC1 → 192.168.1.11
- PC2 → 192.168.1.12
Before enabling DAI, we first need to configure the DHCP server to provide IP addresses to clients.
Configuring DHCP on the Router
The DHCP server must be configured to assign IPs dynamically. Below is the DHCP configuration:
DCHP# show run | s dhcp
ip dhcp excluded-address 192.168.1.1 192.168.1.10
ip dhcp pool VLAN1
 network 192.168.1.0 255.255.255.0
 default-router 192.168.1.1
 dns-server 8.8.8.8
This configuration:
- Excludes IP addresses from 192.168.1.1 to 192.168.1.10 to prevent dynamic allocation.
- Creates a DHCP pool named VLAN1 with the network 192.168.1.0/24.
- Assigns 192.168.1.1 as the default gateway.
- Uses Google’s public DNS server (8.8.8.8).
Enabling DHCP Snooping
Before enabling DAI, we need to enable DHCP Snooping. As we saw earlier, DAI relies on the DHCP Snooping Binding Table to validate ARP packets.
We enable DHCP Snooping globally and activate it on VLAN 1 (the default VLAN):
SW1(config)# ip dhcp snooping
SW1(config)# ip dhcp snooping vlan 1
SW1(config)# no ip dhcp snooping information option
The information option is mainly used when a DHCP relay agent is involved, which is not the case here, so we disable it.
Now, we need to trust the uplink interface (g0/1) that connects to the DHCP server:
SW1(config)# int g0/1
SW1(config-if)# ip dhcp snooping trust
Verifying the DHCP Snooping Binding Table
Once DHCP Snooping is enabled, we can check the binding table:
SW1#  show ip dhcp snooping binding
MacAddress          IpAddress        Lease(sec)  Type           VLAN  Interface
------------------  ---------------  ----------  -------------  ----  --------------------
00:50:79:66:68:8C   192.168.1.11     86304       dhcp-snooping   1     GigabitEthernet0/2
00:50:79:66:68:8F   192.168.1.12     86366       dhcp-snooping   1     GigabitEthernet0/3
Total number of bindings: 2
This confirms that PC1 and PC2 have been assigned their respective IP addresses via DHCP.
Enabling DAI
DAI only requires one command per VLAN to be activated.
Since we are using VLAN 1, we apply the following command:
SW1(config)# ip arp inspection vlan 1
If you have multiple VLANs, you must enable ARP inspection for each VLAN individually.
Configuring Trusted Ports
By default, all switch ports are untrusted.
We need to configure trusted ports, which are typically uplinks to other network devices. In our case:
- g0/0 (toward another switch/router)
- g0/1 (toward the DHCP server)

On SW1
SW1(config)# int g0/0
SW1(config-if)# ip arp inspection trust

SW1(config)# int g0/1
SW1(config-if)#  ip arp inspection trust
Now, ARP packets on these interfaces will not be inspected.
Verifying DAI Configuration
We can verify that DAI is working correctly using the following command:
SW1#  show ip arp inspection interfaces

 Interface        Trust State     Rate (pps)    Burst Interval
 ---------------  -----------     ----------    --------------
 Gi0/0            Trusted               None               N/A
 Gi0/1            Trusted               None               N/A
 Gi0/2            Untrusted               15                 1
 Gi0/3            Untrusted               15                 1
 Gi1/0            Untrusted               15                 1
 Gi1/1            Untrusted               15                 1
 Gi1/2            Untrusted               15                 1
 Gi1/3            Untrusted               15                 1
We can see that:
- g0/0 and g0/1 are trusted.
- All other ports remain untrusted and will be inspected by DAI.
Simulating an ARP Spoofing Attack
Now, let’s see DAI in action by testing what happens when an attacker tries to send fake ARP messages.
PC2 (attacker) attempts to impersonate the default gateway (192.168.1.1). The attacker sends a Gratuitous ARP (GARP) claiming their MAC address belongs to 192.168.1.1.
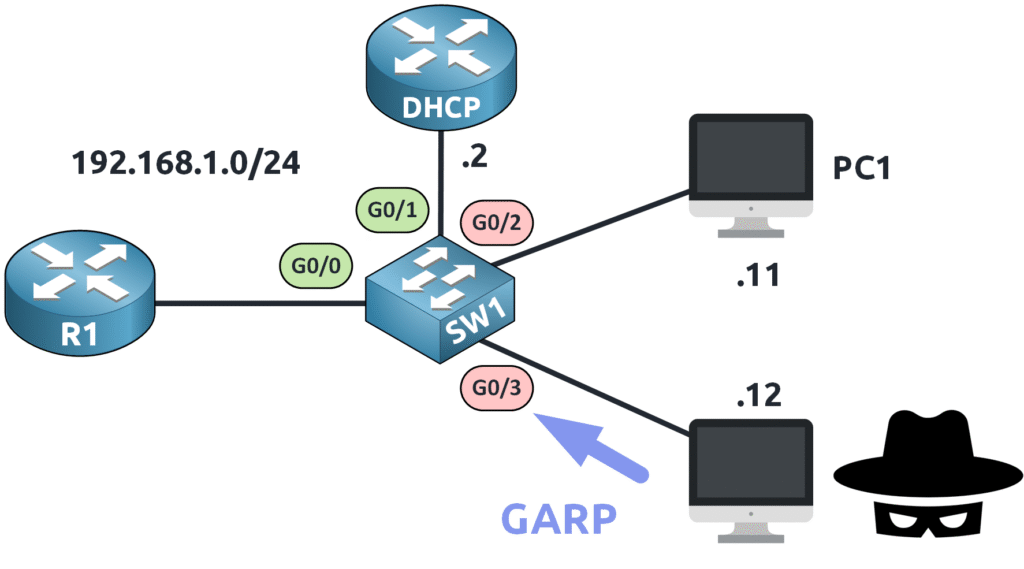
A Gratuitous ARP (GARP) is an ARP message where a device announces its own IP-to-MAC mapping, which is often used for legitimate purposes but can be exploited in attacks.
Here’s what the attacker’s packet looks like in Wireshark:

DAI Blocks the Attack
Because the DHCP Snooping Binding Table does not have an entry matching the attacker’s forged IP-to-MAC mapping, DAI immediately blocks the ARP packets.
*Jan 31 16:18:51.531: %SW_DAI-4-DHCP_SNOOPING_DENY: 1 Invalid ARPs (Req) on Gi0/3, vlan 1.([0050.7966.688f/192.168.1.1/ffff.ffff.ffff/192.168.1.1/
16:18:50 UTC Fri Jan 31 2025])

*Jan 31 16:18:52.531: %SW_DAI-4-DHCP_SNOOPING_DENY: 1 Invalid ARPs (Req) on Gi0/3, vlan 1.([0050.7966.688f/192.168.1.1/ffff.ffff.ffff/192.168.1.1/
16:18:51 UTC Fri Jan 31 2025])

*Jan 31 16:18:53.590: %SW_DAI-4-DHCP_SNOOPING_DENY: 1 Invalid ARPs (Req) on Gi0/3, vlan 1.([0050.7966.688f/192.168.1.1/ffff.ffff.ffff/192.168.1.1/
16:18:52 UTC Fri Jan 31 2025])
The attacker’s ARP packets are dropped, preventing the man-in-the-middle attack.
5. DAI Rate Limiting
Attackers may attempt to flood the switch with a massive number of fake ARP messages, potentially overloading the CPU and causing instability.
To counter this, DAI includes a built-in protection mechanism that can disable an interface (err-disabled state) if it detects an excessive number of invalid ARP messages.
By default, each untrusted port has a rate limit (pps – packets per second) for ARP inspection. You can view the current rate using:
SW1# show ip arp inspection interfaces
 Interface        Trust State     Rate (pps)    Burst Interval
 ---------------  -----------     ----------    --------------
 Gi0/0            Trusted               None               N/A
 Gi0/1            Trusted               None               N/A
 Gi0/2            Untrusted               15                 1
 Gi0/3            Untrusted               15                 1
 Gi1/0            Untrusted               15                 1
 Gi1/1            Untrusted               15                 1
 Gi1/2            Untrusted               15                 1
 Gi1/3            Untrusted               15                 1
By default, the rate limit is set to 15 ARP packets per second (pps) with a burst interval of 1 second.
This means:
- The switch will inspect and drop up to 15 invalid ARP messages per second.
- If the threshold is exceeded (more than 15 invalid ARP packets in one second), the interface will immediately shut down and enter
err-disabledmode. - The port will remain disabled until it is manually restored or an automatic recovery mechanism is configured.
Adjusting the Rate Limit
To modify the rate limit on a specific interface, use the following command:
SW1(config)# int g0/3
SW1(config-if)# ip arp inspection limit rate 30 burst interval 3
In this example:
- The interface g0/3 is configured to allow up to 30 invalid ARP packets within 3 seconds.
- If the limit is exceeded, the interface will shut down and enter
err-disabledstate.
We can verify the updated rate limit with:
SW1# show ip arp inspection interfaces

 Interface        Trust State     Rate (pps)    Burst Interval
 ---------------  -----------     ----------    --------------
 Gi0/0            Trusted               None               N/A
 Gi0/1            Trusted               None               N/A
 Gi0/2            Untrusted               15                 1
 Gi0/3            Untrusted               30                 3
 Gi1/0            Untrusted               15                 1
 Gi1/1            Untrusted               15                 1
 Gi1/2            Untrusted               15                 1
 Gi1/3            Untrusted               15                 1
Now, g0/3 is allowed a higher threshold before being disabled.
What Happens When an Interface Enters err-disabled Mode?
If an attacker sends too many fake ARP messages and exceeds the configured limit, the switch disables the interface to prevent CPU overload. The log message will indicate this:
%SW_DAI-4-ERRDISABLE: arp-inspection rate-limit on Gi0/3, putting interface in err-disabled state
At this point, the port is completely disabled and cannot pass any traffic until it is manually or automatically restored.
This feature ensures DAI does not disrupt normal traffic while still protecting the switch from malicious ARP flooding attacks.
6. Re-Enable Interface
It’s great that DAI can automatically disable an interface when an ARP attack occurs, but we also need a way to restore the interface once the attack is mitigated.
Let’s go over how to recover an interface that has entered err-disabled state due to excessive ARP messages.
Manual Recovery
The simplest way to restore a disabled interface is manually using the shutdown and no shutdown commands on the affected interface:
SW1(config)# int g0/3
SW1(config-if)# shutdown
SW1(config-if)# no shutdown
This will reset the interface, bringing it back online immediately.
Enabling Auto-Recovery
Instead of manually restoring interfaces, we can enable automatic recovery so that the switch reactivates the port after a set period.
To check the available error recovery options, use:
SW1(config)# errdisable recovery cause ?
  all                   Enable timer to recover from all error causes
  £arp-inspection        Enable timer to recover from arp inspection error
                        disable state£
  bpduguard             Enable timer to recover from BPDU Guard error
  channel-misconfig     Enable timer to recover from channel misconfig error
                        (STP)
  dhcp-rate-limit       Enable timer to recover from dhcp-rate-limit error
  dtp-flap              Enable timer to recover from dtp-flap error
  gbic-invalid          Enable timer to recover from invalid GBIC error
  inline-power          Enable timer to recover from inline-power error
  l2ptguard             Enable timer to recover from l2protocol-tunnel error
  link-flap             Enable timer to recover from link-flap error
  link-monitor-failure  Enable timer to recover from link monitoring failure
  loopback              Enable timer to recover from loopback error
  mac-limit             Enable timer to recover from mac limit disable state
  oam-remote-failure    Enable timer to recover from OAM detected remote
                        failure
  pagp-flap             Enable timer to recover from pagp-flap error
  port-mode-failure     Enable timer to recover from port mode change failure
  pppoe-ia-rate-limit   Enable timer to recover from PPPoE IA rate-limit error
  psecure-violation     Enable timer to recover from psecure violation error
  psp                   Enable timer to recover from psp
  security-violation    Enable timer to recover from 802.1x violation error
  sfp-config-mismatch   Enable timer to recover from SFP config mismatch error
  storm-control         Enable timer to recover from storm-control error
  udld                  Enable timer to recover from udld error
  unicast-flood         Enable timer to recover from unicast flood error
  vmps                  Enable timer to recover from vmps shutdown error
Since we want to automatically restore interfaces disabled due to ARP inspection, we select arp-inspection:
SW1(config)# errdisable recovery cause arp-inspection
Verifying the Auto-Recovery Configuration
To confirm that auto-recovery is enabled, use:
SW1# show errdisable recovery
ErrDisable Reason            Timer Status
-----------------            --------------
arp-inspection               Enabled
bpduguard                    Disabled
channel-misconfig (STP)      Disabled
dhcp-rate-limit              Disabled
dtp-flap                     Disabled
gbic-invalid                 Disabled
inline-power                 Disabled
l2ptguard                    Disabled
link-flap                    Disabled
mac-limit                    Disabled
link-monitor-failure         Disabled
loopback                     Disabled
oam-remote-failure           Disabled
pagp-flap                    Disabled
port-mode-failure            Disabled
pppoe-ia-rate-limit          Disabled
psecure-violation            Disabled
security-violation           Disabled
sfp-config-mismatch          Disabled
storm-control                Disabled
udld                         Disabled
unicast-flood                Disabled
vmps                         Disabled
psp                          Disabled
dual-active-recovery         Disabled
evc-lite input mapping fa    Disabled
Recovery command: "clear     Disabled

Timer interval: 300 seconds

Interfaces that will be enabled at the next timeout:
The Enabled status next to arp-inspection confirms that if an interface enters err-disabled state due to ARP inspection, it will automatically recover after the configured time.
By default, the recovery timer is set to 300 seconds (5 minutes). If you want to reduce the recovery time, you can modify it:
SW1(config)# errdisable recovery interval 120
Now, any interface disabled due to ARP inspection will automatically reactivate after 120 seconds (2 minutes).
7. DAI Additional Validation Checks
By default, Dynamic ARP Inspection (DAI) verifies the sender MAC and IP address against the DHCP snooping binding table to detect spoofed ARP messages. However, you can enhance security further with additional validation checks using the ip arp inspection validate command.
If you’re reading this, you’re a warrior! Most people wouldn’t make it this far in the course—aha! 💪
DAI supports three additional validation checks:
SW1(config)# ip arp inspection validate ?
  dst-mac  Validate destination MAC address
  ip       Validate IP addresses
  src-mac  Validate source MAC address
Destination MAC Validation (dst-mac)
This check ensures that the destination MAC address in the Ethernet frame matches the target MAC address in the ARP message. If they don’t match, the ARP packet is dropped.
This protects against MITM (Man-in-the-Middle) attacks and traffic redirection, where attackers attempt to send ARP replies to the wrong MAC address.
IP Validation (ip)
The IP validation blocks ARP messages with invalid or unexpected IP addresses, such as:
0.0.0.0(invalid address)255.255.255.255(broadcast address)- Multicast addresses (e.g.,
224.0.0.0/4)
These addresses should never be assigned to individual devices. This validation prevents attackers from injecting malicious ARP replies containing fake or unusable IP addresses.
Source MAC Validation (src-mac)
This check compares the source MAC in the Ethernet frame with the sender MAC in the ARP message. If they don’t match, the ARP packet is dropped.
This is critical for blocking ARP spoofing attacks, where an attacker sends ARP packets pretending to be another device. A mismatch indicates a forged ARP packet.
Enabling DAI Validation Checks
To enable all three validation checks, you must configure them in a single command. If you enter them separately, each new command will overwrite the previous one.
SW1(config)# ip arp inspection validate ip src-mac dst-mac
Verifying the Configuration
To confirm that the validation checks are active, use:
SW1# show run | include validate
 ip arp inspection validate ip src-mac dst-mac
If you want to enable only specific checks, adjust the command accordingly.
For example, to enable only IP and source MAC validation:
SW1(config)# ip arp inspection validate ip src-mac
8. Conclusion
Dynamic ARP Inspection (DAI) is an essential security mechanism that protects networks from ARP-based attacks, including spoofing and man-in-the-middle (MITM) attacks. By inspecting ARP messages, validating MAC-to-IP mappings, and blocking unauthorized traffic, DAI strengthens the integrity of your network.
Key Takeaways
✅ DAI categorizes ports as trusted or untrusted, ensuring ARP validation happens only where necessary.
✅ Integration with DHCP Snooping allows DAI to reference a trusted binding table for ARP validation.
✅ Rate limiting prevents ARP flooding attacks, protecting the switch from excessive CPU usage.
✅ Automatic recovery can be enabled to restore interfaces that enter the err-disabled state due to excessive ARP violations.
✅ Additional validation checks (ip, src-mac, dst-mac) enhance security, detecting even more advanced ARP-based attacks.
When properly configured, DAI effectively mitigates ARP poisoning threats, ensuring a secure, stable, and trusted network environment.
To find out more, see the official Cisco documentation at
